
https://www.copymethat.com/r/isGkDapjc/no-knead-bread-jim-lahey/
50889952
4sV0mki
isGkDapjc
2024-07-27 01:56:17
loading...
X
Servings: One 10-inch round loaf
Servings: One 10-inch round loaf
Ingredients
- Bread flour 430 grams
- Water 345 grams of water
- Yeast 1 gram of yeast (¼ tsp)
- salt 12 grams (2 tsp kosher)
- Wheat bran, cornmeal, or additional flour for dusting
Steps
- In a medium bowl, stir together the flour, salt, and yeast. Add the water and, using a wooden spoon or your hand, mix until you have a wet, sticky dough, about 30 seconds. Make sure it’s really sticky to the touch; if it’s not, mix in another tablespoon or two of water. Cover the bowl with a plate, tea towel, or plastic wrap and let sit at room temperature (about 72 degrees F), out of direct sunlight, until the surface is dotted with bubbles and the dough is more than doubled in size. This will take a minimum of 12 hours and (my preference) up to 18 hours. This slow rise - fermentation - is the key to flavor.
- When the first fermentation is complete, generously dust a work surface (a wooden or plastic board is fine) with flour. Use a bowl scraper or rubber spatula to scrape the dough out of the bowl in one piece. When you begin to pull the dough away from the bowl, it will cling in long, thin strands (this is the developed gluten), and it will be quite loose and sticky - do not add more flour. Use slightly floured hands or a bowl scraper or spatula to lift the edges of the dough in toward the center. Nudge and tuck in the edges of the dough to make it round.
- Place a cotton or linen tea towel (not terry cloth, which tends to stick and may leave lint in the dough) or a large cloth napkin on your work surface and generously dust the cloth with wheat bran, cornmeal, or flour. Use your hands or a bowl scraper or a wooden spatula to gently lift the dough to cover it and place it in a warm, draft-free spot to rise for 1 to 2 hours. The dough is ready when it is almost doubled. If you gently poke it with your finger, making an indentation about ¼ inch deep, it should hold the impression. If it doesn’t, let it rise for another 15 minutes.
- Half an hour before the end of the second rise, preheat the oven to 475 degrees F, with a rack in the lower third position, and place a covered 4 ½ to 5 ½- quart heavy pot in the center of the rack.
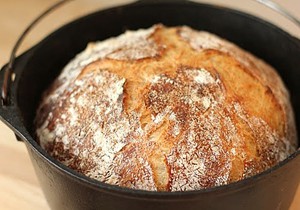
- Using pot holders, carefully remove the preheated pot from the oven, and uncover it. Unfold the tea towel, lightly dust the dough with flour or bran, lift up the dough, either on the towel or in your hand, and quickly but gently invert it into the pot, seam side up. (Use caution - the pot will be very hot; see photos, page 55.) Cover the pot and bake for 20 minutes.
- Remove the lid and continue baking until the bread is a deep, chestnut color but not burnt, 15 to 30 minutes more. Use a heatproof spatula or pot holders to carefully lift the bread out of the pot and place it on a rack to cool thoroughly. Don’t slice or tear into it until it has cooled, which usually takes at least an hour.
Notes
- Original recipe uses 8g salt.
- Try: After taking lid off dutch oven, put oven on baking sheet. prevents burnt bottoms
- Try: After bake is done, turn off oven, crack door, and let bread sit in oven for 20 minutes curing crust
- Bake bread darker!
- Notes from Bittman www.nytimes.com/2006/12/06/dining/06mini.html
- SALT Many people, me included, felt Mr. Lahey’s bread was not salty enough. Yes, you can use more salt and it won’t significantly affect the rising time. I’ve settled at just under a tablespoon.
- TIMING About 18 hours is the preferred initial rising time. Some readers have cut this to as little as eight hours and reported little difference. I have not had much luck with shorter times, but I have gone nearly 24 hours without a problem. Room temperature will affect the rising time, and so will the temperature of the water you add (I start with tepid). Like many other people, I’m eager to see what effect warmer weather will have. But to those who have moved the rising dough around the room trying to find the 70-degree sweet spot: please stop. Any normal room temperature is fine. Just wait until you see bubbles and well-developed gluten - the long strands that cling to the sides of the bowl when you tilt it - before proceeding.
- THE SECOND RISE Mr. Lahey originally suggested one to two hours, but two to three is more like it, in my experience. (Ambient temperatures in the summer will probably knock this time down some.) Some readers almost entirely skipped this rise, shaping the dough after the first rise and letting it rest while the pot and oven preheat; this is worth trying, of course.
- OTHER FLOURS Up to 30 percent whole-grain flour works consistently and well, and 50 percent whole-wheat is also excellent. At least one reader used 100 percent whole-wheat and reported “great crust but somewhat inferior crumb,” which sounds promising. I’ve kept rye, which is delicious but notoriously impossible to get to rise, to about 20 percent. There is room to experiment.
- FLAVORINGS The best time to add caraway seeds, chopped olives, onions, cheese, walnuts, raisins or whatever other traditional bread flavorings you like is after you’ve mixed the dough. But it’s not the only time; you can fold in ingredients before the second rising.
- COVERING BETWEEN RISES A Silpat mat under the dough is a clever idea (not mine). Plastic wrap can be used as a top layer in place of a second towel.