

https://www.copymethat.com/r/c5vqC2rOl/lasagne-bolognese/
56370784
EcdRFeq
c5vqC2rOl
2024-05-06 18:24:44
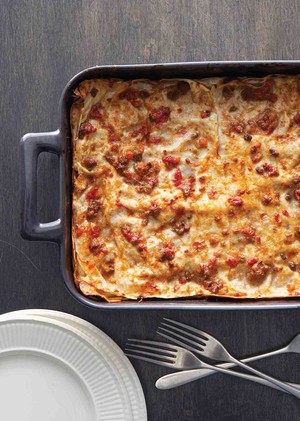
Lasagne Bolognese

loading...
X
Extra Work But To Die For
Servings: 6
Servings: 6
Ingredients
- subheading: For the Bolognese meat sauce:
- ¾ medium yellow onion
- 1 large carrot
- 1 large stalk celery
- 5 tbsp butter
- 3 Tbs extra-virgin olive oil
- 1¼ lb. ground beef / pork mixture
- ¾ cup dry white wine
- ¾ cup whole milk
- 3 cups canned whole peeled tomatoes with their juices
- 2 tsp kosher salt
- subheading: For the béchamel sauce:
- 2 cups whole milk
- 4 tablespoons butter (2 oz)
- 4 tablespoons flour
- ½ teaspoon salt
- ⅛ teaspoon nutmeg
- subheading: For the lasagne noodles:
- 2¼ cups all-purpose unbleached flour
- 3 large eggs
- subheading: For the lasagne assembly:
- Salt, for the cooking water
- 1½ cups freshly grated Parmigiano-Reggiano
- 1 tablespoon butter, cut into pieces
Steps
- subheading: Make the Bolognese meat sauce:
- Peel and finely chop the onion. Peel the carrot and celery and cut into ¼-inch dice. Place the onion, carrot, celery, butter, and olive oil in a heavy-bottomed sauce pot over medium-high heat. Sauté, stirring occasionally, until the vegetables are lightly browned, about 15 minutes.
- Add the ground beef and break it up with a wooden spoon. Add the wine and cook, stirring occasionally, until almost half the liquid has evaporated. Add the milk and cook, stirring occasionally, until half the milk has evaporated.
- Coarsely chop the tomatoes and add them along with their juice and the salt to the pot. Once the tomatoes have started bubbling, turn down the heat to very low so that the sauce is barely simmering. Cook, uncovered, for 3 hours, stirring every 15 to 20 minutes. If all the liquid evaporates before the cooking time is up, add water in 1-cup increments as needed. A traditional bolognese would have you cook off all the liquid but for lasagne we need some moisture to remain help cook the noodles.
- subheading: Make the béchamel sauce:
- Pour the milk into a small saucepan and place over medium heat until steam is released when the milk is stirred, 180F. This happens just before it comes to a boil.
- While the milk is heating, melt the butter in a 2-quart saucepan over medium-low heat. Add the flour, mixing it in with a whisk until the mixture is smooth. Cook, whisking constantly, for about 1 minute. Do not let the flour brown. Remove the pan from the heat.
- When the milk is hot, transfer it to a measuring cup or pitcher with a spout to avoid a big mess. Return the pan with the flour mixture to medium heat and begin adding the hot milk, very slowly at first, mixing with the whisk. Do not be concerned if the mixture becomes quite thick at first. Continue adding the milk slowly while mixing with the whisk. As the consistency becomes thinner, start adding the milk more rapidly until all of it has been mixed in.
- Add the salt and nutmeg and cook over medium heat, still whisking constantly, until the sauce begins to thicken, 10 minutes. Don't need this to be super thick, however, as we need to be able to drizzle it from a spoon. The sauce is done when it coats the whisk thickly.
- subheading: Make the pasta (see notes):
- REPLACE THIS WITH LINK TO NEW RECIPE AFTER SOME TESTING
- Pour the flour in a mound in the center of your work counter. With your fingers, dig down in the center of the flour and when your fingers reach the counter, push the sides out to make a well in which the eggs will fit comfortably. (It’s better to make the well a little wider than necessary than too small and risk the eggs overflowing.)
- Break the eggs into the center of the well. Using a fork, beat the eggs as if you were making scrambled eggs until the yolks and the whites are thoroughly blended together. Use the fork to mix a little flour from the bottom of the inside walls of the well into the eggs. Continue until the mixture thickens enough to cling to the fork when you lift it into the air. Use your fingers to squeeze the dough attached to the fork back into the well and set the fork aside. Push about ¼ cup flour to the side, then use your hands to bring the rest into the center of the well. Mix together with your hands until a dough that clings together begins to form. If the dough feels sticky when you plunge a finger into it, add a little more flour. The dough should feel moist but not sticky. Wrap the dough in plastic wrap (the surface of the dough can begin to dry out in as little as a minute) and then scrape off any bits of dough that have stuck to the counter. Reserve any remaining flour off to the side.
- Unwrap the dough and begin kneading it. Think of stretching the dough rather than compressing it by using the heel of your palm and pushing away from you. Knead until the dough feels homogeneous and smooth. If it seems to stick to your hand or to the counter, add a little more flour. On the other hand, if it feels too hard to knead, you may have added too much flour. Try wetting your hands and kneading the moisture in. If that doesn’t seem to help, it’s probably easier and faster to start over. If you don’t need to add any more flour while kneading, it should only take 5 to 6 minutes. Adding flour during the kneading process may increase the time since the further along you are, the longer it takes for the flour to get incorporated. When you’ve kneaded the dough sufficiently, wrap it in plastic wrap again and let it rest for at least 15 minutes or up to 3 hours. Never refrigerate or freeze pasta dough. As the dough rests, the gluten in the flour will relax, making it much easier to roll the dough.
- After the dough has rested, unwrap it and knead it a few times to incorporate the moisture that inevitably rises to the surface. The surface of the dough at this point should feel silky smooth (a baby’s bottom is the traditional comparison).
- Cut the dough into 4 pieces. Wrap 3 of the pieces in the plastic wrap. Flatten the remaining piece of dough as best you can with your hands then put it through the rollers of the machine set at the widest setting. Fold the dough in 3, and put it through the rollers again with the folds perpendicular to the rollers. Fold the dough in half and put it through one more time, again with the folds perpendicular to the rollers. Lay the dough on a towel and repeat the procedure with the remaining 3 pieces.
- When all the pieces have been through the machine at the widest setting, adjust the rollers down one notch and put each piece of dough through once. Repeat, going down one notch at time, until you reach either #5 or #6, depending how delicate you want it to be and how many layers you are going for. You will need to cut it in half at least once to keep the length manageable. Wrap the pasta in plastic wrap and set aside to rest if you are not ready to assemble it.
- subheading: Assemble the lasagne (see notes):
- Preheat the oven to 425°F (218°C) and lightly oil a 9x13 baking dish to make clean-up a bit easier.
- The béchamel will likely have thickened quite a bit by now, so before starting, stir some milk into the béchamel so that when you pull a wooden spoon out the sauce drools off the end nicely.
- Spread a thin coating of meat sauce on the bottom of the baking dish as a base.
- Put down a layer of pasta, stretching and cutting as needed. Top the pasta with an uneven layer of sauce. Top the sauce with an uneven layer of béchamel, allowing it to drool off the end of a wooden spoon into little islands. Top the béchamel with a layer of Parmigiano, focusing on the areas without the béchamel. The goal is variety in each layer so every bite is a bit different. But, for each layer, try to make sure there is either meat sauce or béchamel along the edges so that the pasta has some liquid to cook in. Repeat this process until you run out of one of the ingredients. Add extra Parmigiano on the top layer as it will crisp up in the oven.
- Bake until the top of the lasagne is lightly browned, 20 to 25 minutes. Take the lasagne out of the oven and let it rest for 5 minutes before serving.
Notes
- No Fresh Pasta: You can of course use dried or store-bought sheets. Follow their directions for cooking in advance. Even the store bought fresh pasta will likely need a bit of cooking as it is much thicker than how I make mine.
- Amounts: I always find that I don't have enough meat sauce (I increased the recipe recently so you should be okay) but usually have too much béchamel (still true).
- Make Ahead: The lasagne can be assembled completely up to 1 day in advance and kept, well wrapped, in the refrigerator. Remove it from the refrigerator 1 hour before baking.