

https://www.copymethat.com/r/xJ4qipcRH/high-hydration-sourdough-bread/
137444017
mGOZT41
xJ4qipcRH
2024-05-02 12:09:56
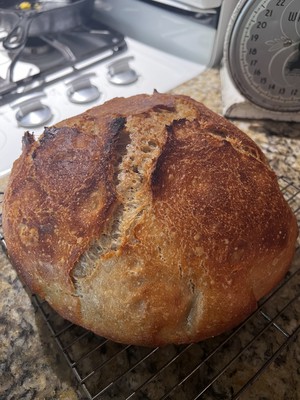
High Hydration Sourdough Bread

loading...
X

Servings: 12
Servings: 12
Ingredients
- 375 grams unbleached all purpose (13.2 oz)
- 100 grams whole wheat flour (or Spelt, 3.5 oz)
- 100 grams sourdough starter active and bubbly (100% hydration, fed with equal parts flour and water, 3.2 oz)
- 390 grams water (13.8 oz)
- 10 grams salt (1.5 tsp)
- 1 Tablespoon molasses (optional)
Steps
- Feed a sourdough starter 4 to 12 hours before making your bread. The time it takes a starter to double in size and become active and bubbly depends on factors such as temperature and the maturity of your starter.
- Combine the ingredients in a mixing bowl. I find using a dough whisk works best for this or a wooden spoon.
- Allow this mixture to rest for 30 minutes. This is called autolyse, the process of hydrating the flour.
- Dampen clean hands with water. Use your hands to mix the dough until it comes together. This takes about 5 minutes. Cover the dough with plastic wrap or a damp tea towel and allow another 30 minute rest.
- subheading: Stretch And Fold:
- This is a no knead recipe. So, for gluten development, perform 6 rounds of stretch and folds.
- With the dough in a large bowl, grab the edge of the dough with damp hands and firmly pull up, stretching it upwards. Place the dough into the center of the dough ball. Give the bowl a quarter turn and do this same process again. Repeat this one to two times. This is considered one round of stretch and folds. Repeat according to the directions below.
- First 3 stretch and folds - every 15 minutes. Last 3 stretch and folds - every 30 minutes.
- subheading: Bulk Ferment:
- To ensure a beautiful rise and airy crumb, the dough will need to bulk ferment until doubled.
- To do this, cover the dough with a wet towel or plastic wrap to avoid a crust forming. This process may not take as long to ferment as other doughs. Keep an eye on it!
- subheading: Shape:
- Add a little bit of flour to a work surface.
- Gently take your dough out of the bowl. Be extra careful with a high hydration loaf!
- Shape it into a ball by creating surface tension. To do this, gently spin it towards you.
- Let it sit out 15 to 20 minutes loosely covered on oiled parchment paper in a medium mixing bowl - spray top with oil. Cover with a plastic bag and proof in refrigerator 12 to 15 hours.
- subheading: Baking:
- Preheat your oven to 500 degrees F. Place the Dutch oven inside and preheat for 45 minutes to one hour.
- An hour before baking, remove your dough from the fridge. Dust the top with flour and score using a razor blade or scoring lame … or scissors.
- Transfer the dough to the Dutch oven using the parchment paper as a sling. Cover with lid.
- Bake for 20 minutes at 450 F degrees with the lid on. After 20 minutes remove lid and place a canning ring under parchment/dough to raise dough off bottom of pan and reduce heat to 425. Bake another 20 to 25 minutes without the lid until bread reaches 205F
- Carefully take your finished loaf out of the Dutch oven and place on a wire rack to finish cooling.
- Allow your bread to cool completely before slicing into it.
Notes
- Watch your dough closely during bulk fermentation. Higher hydration doughs tend to ferment faster. Over fermented dough will become sticky and unworkable. The amount of time it takes for your dough to proof depends on many factors, including the maturity of your starter and environment.
- Be gentle when dealing with high hydration dough after the bulk ferment and during shaping to make the crumb more open and even. Using a bench scraper can help move your dough more gently.
- You need an active starter for this recipe that is at 100% hydration, meaning it is fed equal parts water and flour.